 Illustration 1
1. What You Need to Get Started
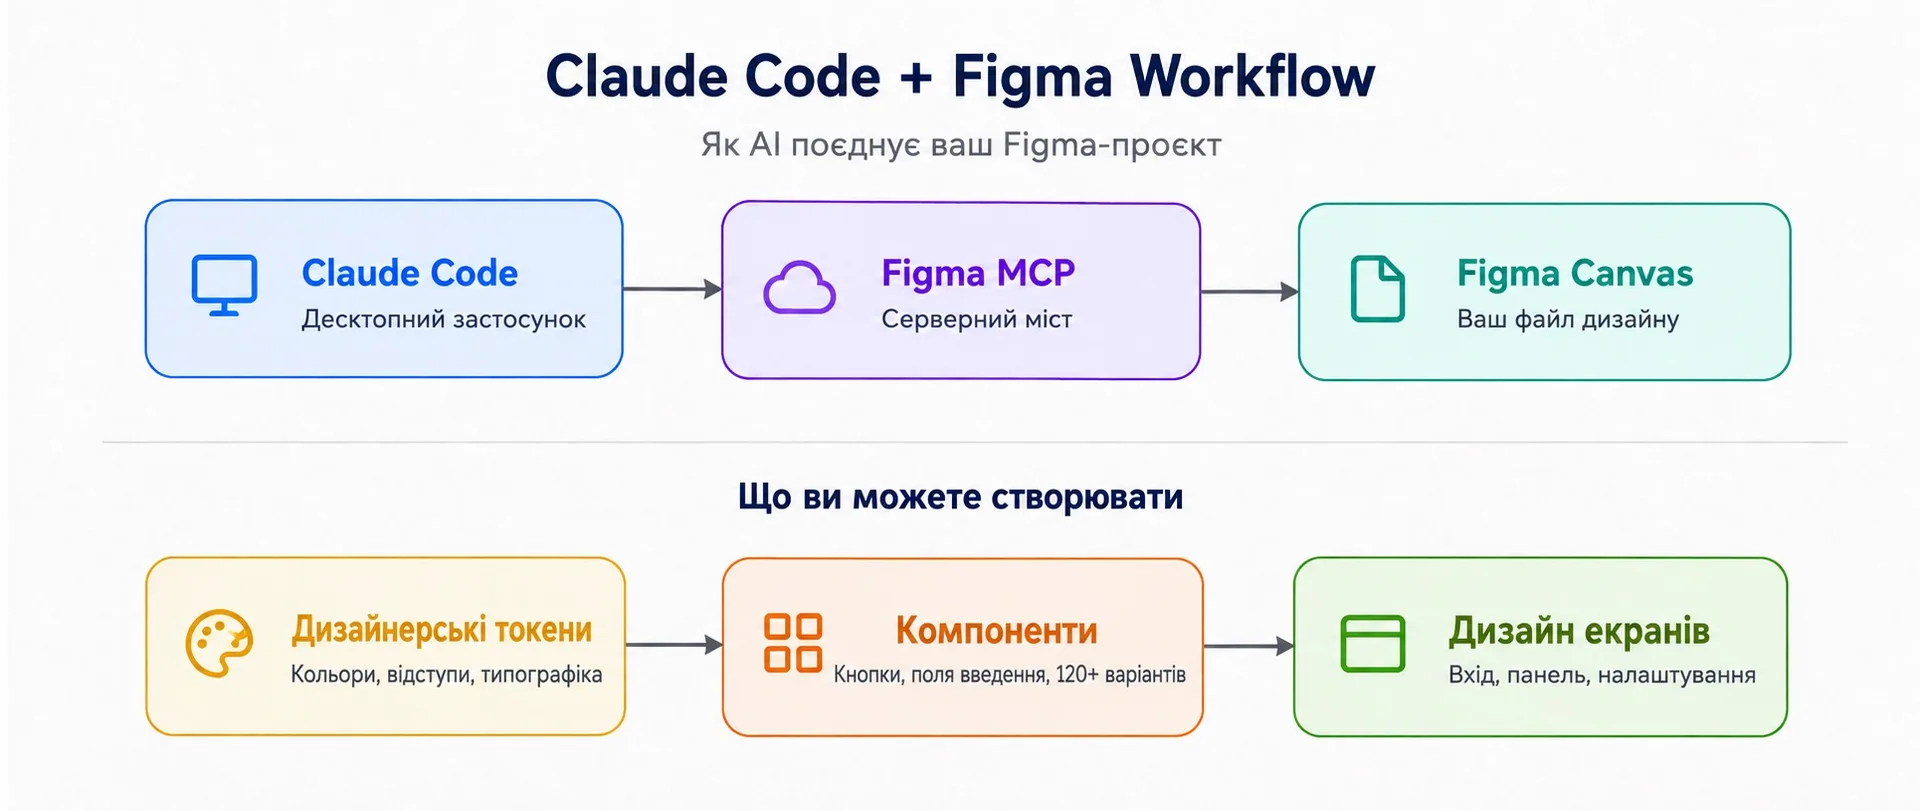
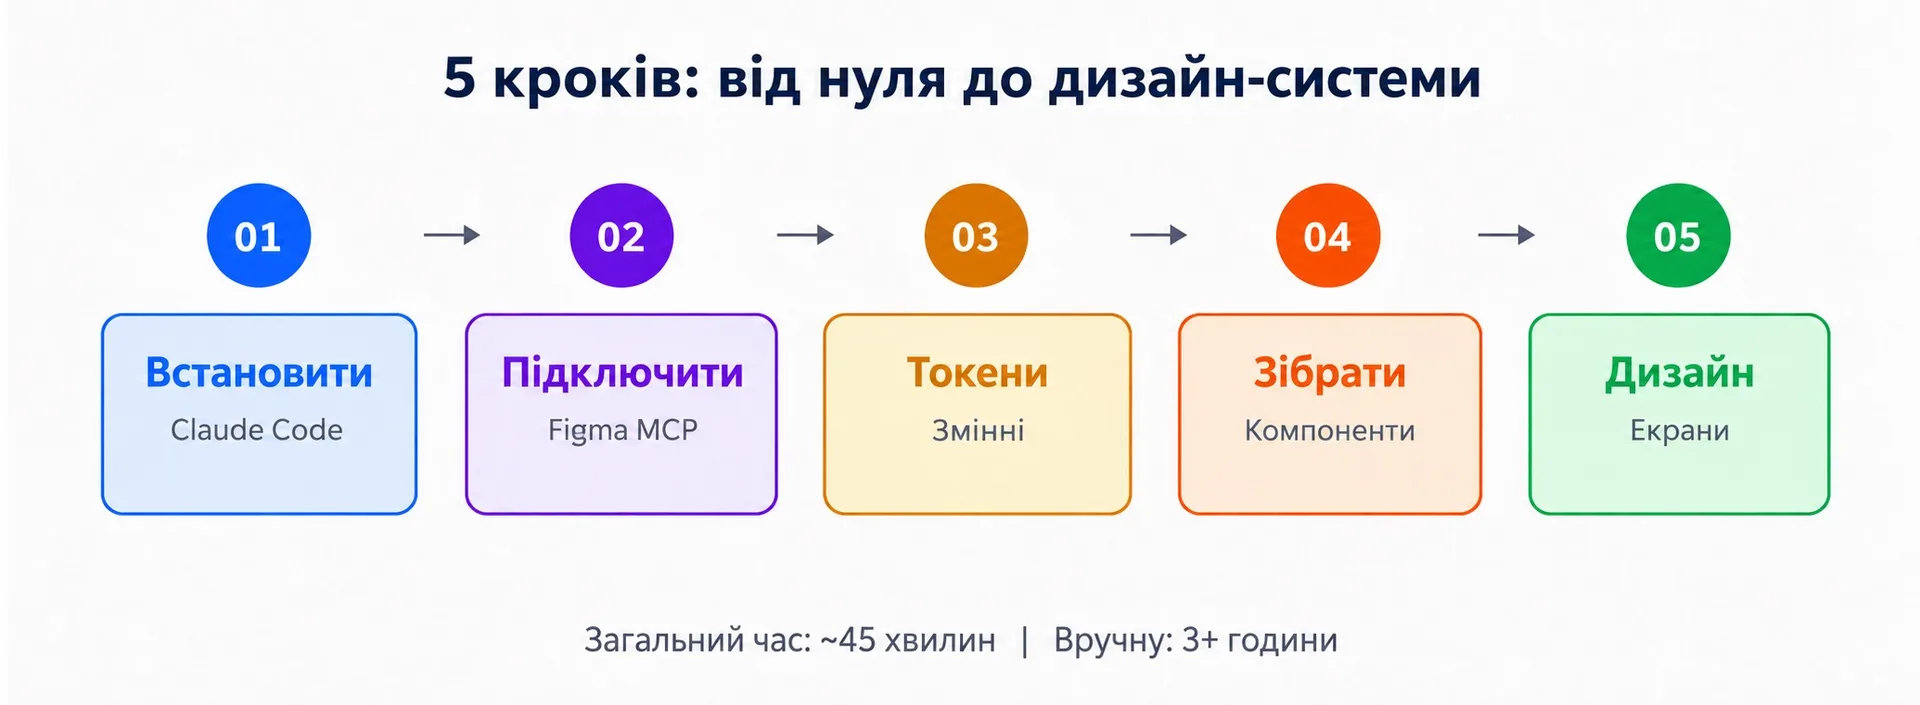
You can connect Claude Code directly to Figma and use it to build a complete design system from scratch: variables, tokens, components, and ready-made screens. This guide walks you through the entire process step-by-step — from installation to the final login screen.
Before you begin, make sure you have:
- Claude Code desktop app — an application with three modes: Chat, Code, and Agentic.
- An active Claude subscription — a free account is not suitable for this workflow.
- A Figma account — with at least one open file.
- Time — 30-45 minutes of uninterrupted focus to complete the full workflow.
This workflow consumes Claude usage limits. Building complex components like a button with 120+ variants may consume a significant portion of your hourly limit. Start with simpler tasks to get a feel for the process before tackling ambitious projects.
 What You Need to Get Started — illustration 2
2. Installing Claude Code
Go to claude.ai/download and download the Claude Code desktop app for your OS (macOS or Windows).
After installation, the app will ask you to authenticate — log in using your Claude subscription credentials. Once done, you’ll see an interface with three modes:
- Chat — standard conversational Claude.
- Code — for coding tasks.
- Agentic — where the main work with Figma happens.
The Agentic mode is used for working with Figma: it allows Claude to perform autonomous actions, including direct interaction with your Figma canvas.
 What You Need to Get Started — illustration 3
3. Connecting Claude to Figma via MCP
This is the key step that makes the entire workflow possible. Claude connects to Figma through an MCP (Model Context Protocol) server.
Connection Procedure:
- In the Claude Code app, go to Settings.
- Open the MCP Servers section.
- Click «Add MCP Server».
- Select Figma from the list of available integrations.
- Authenticate via your Figma account (follow the OAuth flow).
- Once connected, Figma will appear in the list of active MCP servers.
How to Verify It’s Working:
Open any Figma file in your browser and ask Claude a simple question:
If Claude describes the contents of your file — the connection is established. If not — check the MCP server configuration and ensure the Figma file is open.
Before starting, create a separate Figma file or a dedicated page within an existing one. This isolates experiments from production materials.
 Step 3 — Creating a Complete Variable System with AI — illustration 4
4. Creating a Complete Variable System with AI
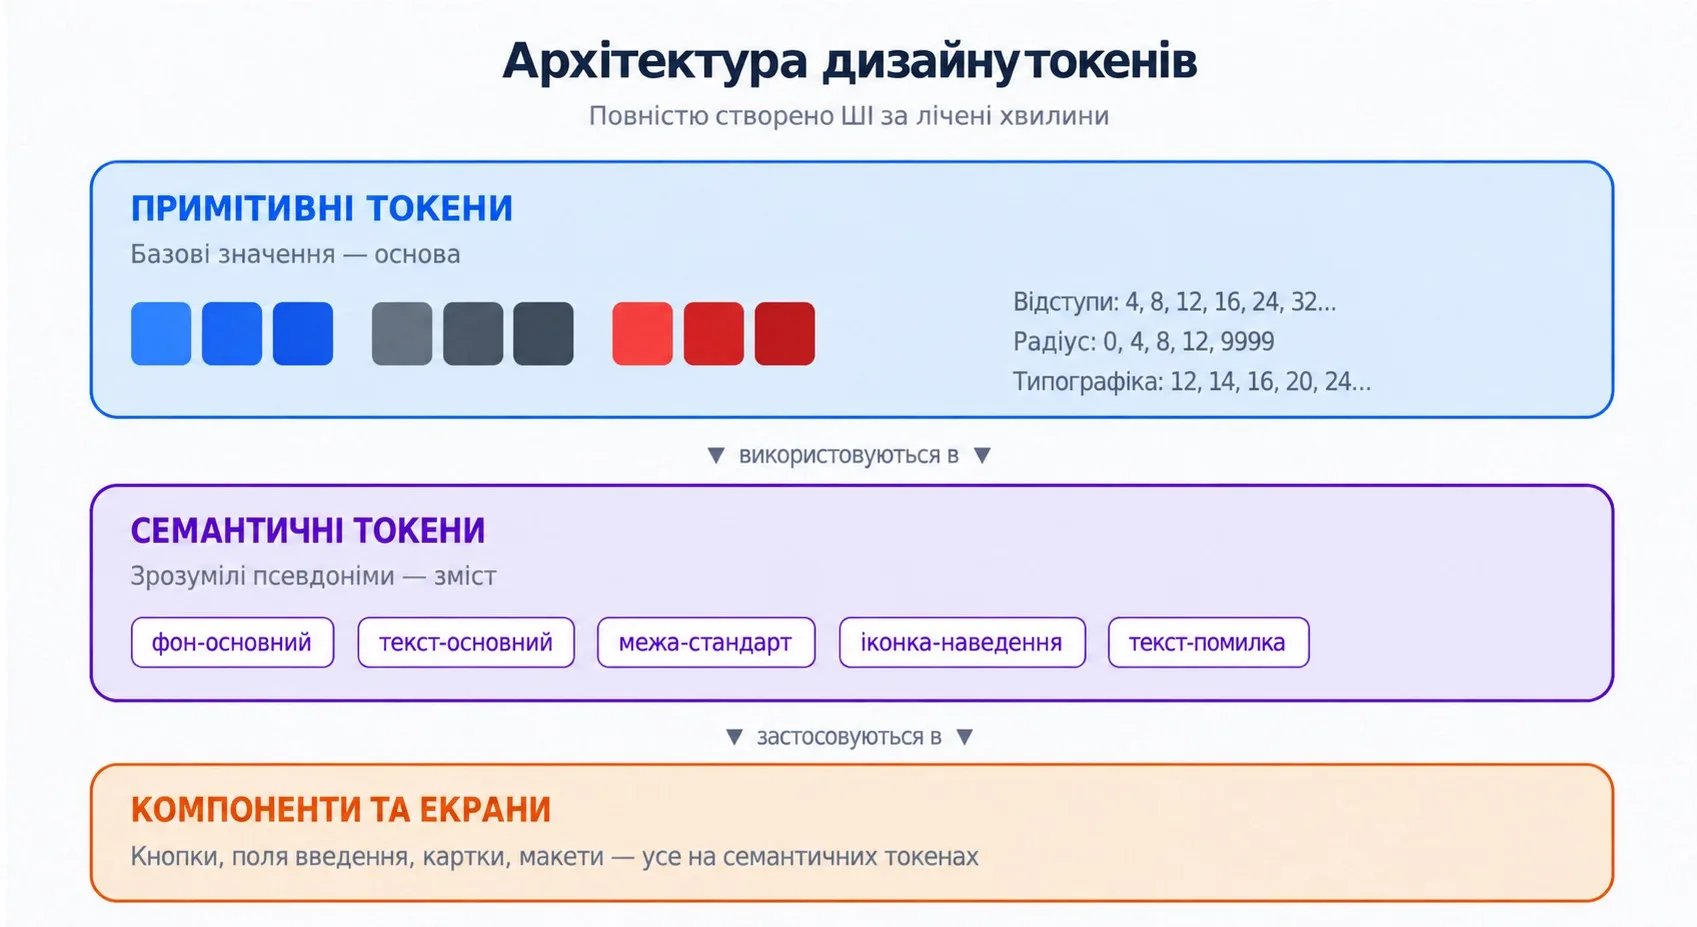
Instead of manually creating dozens of color, typography, and spacing variables, Claude builds the entire token architecture autonomously.
Prompt for Creating the Variable System:
What Claude Creates as a Result:
Claude begins working autonomously in the Figma file. After a few minutes, the Variables panel shows:
- Primitive Colors — a complete set of color ramps, properly organized into collections.
- Semantic Colors — all correctly referencing the primitive collection (not hardcoded hex values, but actual references).
- Interface tokens — background, text, icon, and border tokens with hover and active states.
- Typography system — text styles linked to corresponding variables.
- Dimension tokens — spacing and radius scales, ready for immediate use.
Semantic tokens are properly aliased to primitives — meaning changing one primitive color automatically cascades throughout the system. This is how a well-structured design system is built manually, except here it takes minutes instead of hours.
After generation, verify color values against your brand guidelines. AI chooses reasonable defaults, but your specific brand blue likely differs from what the model selects. Change the primitives — and the entire semantic layer updates automatically.
5. Creating a Complex Button Component: 120+ Variants
The real stress test of the workflow is a button component not in a simplified form, but with full design-system rigor.
Prompt for Creating the Component:
Generation takes noticeably longer and consumes a significant portion of the usage limit. The result is a full component set with more than 120 variants.
What Works Excellent:
- Auto-layout structure is correct: proper padding and gap, all from dimension tokens.
- Colors are assigned accurately: primary buttons use primary colors, danger uses error-reds, all from semantic tokens.
- Text styles: applied correctly across all sizes.
- Component properties: configured for seamless variant switching.
- Naming convention: followed consistently.
What Requires Manual Adjustment:
- Icons: Claude struggles to create real icons. Placeholder shapes are generated, but not always accurate. Better to specify a concrete simple shape («use a star shape» or «use an arrow») or swap with vector SVGs manually.
- Loading state: spinner positioning may shift due to absolute positioning issues — quick manual fix needed.
- Minor padding discrepancies: some variants may have slightly different spacing values (cleanup takes 2-3 minutes).
For a component that typically takes 2-3 hours to build manually from scratch — with variants, tokens, and auto-layout — Claude completes about 85% of the work correctly. The remaining 15% requires quick manual polishing.
6. Laying Out a Screen Based on the Design System
Final test: Can Claude assemble a complete screen using the design system it just created? Key condition — don’t regenerate everything from scratch, but use existing components and variables.
Prompt for Creating the Login Screen:
What Claude Assembles as a Result:
A ready-made login screen with correct structure. Overall layout is maintained — proper split-screen, well-organized form, design tokens used throughout the screen.
What Impresses:
- Component reuse: Claude uses the exact button component from the system, rather than drawing a new rectangle styled like a button.
- Typographic hierarchy: heading styles, body text, caption — all mapped from the design system.
- Consistent spacing: strictly derived from dimension tokens.
- Overall composition: professional and production-ready.
- Auto-layout applied correctly: makes the design fully responsive.
What Needs Refinement:
- Visual polish of social login buttons.
- Illustration placeholder on the left panel is basic (expected).
- Minor alignment adjustments in form spacing.
The result is not a throwaway prototype, but a solid foundation that can be refined and handed off to development.
7. Honest Breakdown: Where AI Succeeds and Where It Doesn’t
Where Claude + Figma Works Exceptionally Well:
- Variable and token systems: this is where AI performs best. A complete token architecture, which takes hours to build manually, is assembled in minutes, and the structure turns out correct.
- Component scaffolding: generating skeletons for complex components with correct auto-layout, configured properties, and tokens saves a huge amount of time.
- Screen composition: creating structured layouts that leverage existing components and design system tokens yields genuinely useful results.
- Design system consistency: since rules are defined upfront in the prompt, Claude maintains consistency more strictly than most designers do manually.
Where AI Still Falls Short:
- Visual nuances: AI lacks taste. Results are structurally correct but lack the subtle refinements that make a design truly polished.
- Icons and illustrations: Claude struggles to generate decent vector icons. Always provide reference icons or use dedicated plugins.
- Usage limits: complex components quickly consume Claude’s usage quotas. Plan your sessions strategically.
- Positioning: absolute positioning and overflow handling sometimes require manual cleanup.
Summary: this workflow doesn’t replace design thinking. But it radically compresses the execution phase. Claude handles 70–85% of the mechanical work involved in building out a design system, freeing up time for decisions that truly matter: strategy, user scenarios, edge cases, and visual polish.
8. Prompting Tips: Patterns That Work
After practicing with this workflow, certain patterns consistently yield better results:
- Explicitly instruct token usage: always write «use the variable tokens we created», otherwise Claude may hardcode values directly.
- Define naming conventions: Claude follows any naming pattern you specify. Be specific, or you’ll end up with inconsistent names.
- Break complex tasks into steps: don’t ask it to create variables, components, and screens in a single prompt. Do it sequentially.
- Reference existing elements: write «use our button component» instead of «create a button» if you want to reuse what’s already built.
- Specify dimensions explicitly: «40px height with 12px vertical padding and 16px horizontal padding» works better than «medium size».
- Always verify the output: review the Variables panel, Layers panel, and component properties. AI gets the structure right, but details need a human eye.